Cryptography - Kleopatra
Info
Kleopatra uses GPG as its backend. Most if not all that you can do cryptographically with Kleopatra can de done using the command
gpg
Kleopatra is a certificate manager and graphical user interface (GUI) for GnuPG. The software stores your OpenPGP certificates and keys. It is available for Windows and Linux.
https://apps.kde.org/kleopatra/ is its official home page.
For Windows, you can download it as part of Gpg4win package at https://gpg4win.org/download.html
Setup an Assymetric Key
Info
Only the location of the title, minimize, maximize, and close buttons naturally vary between operating systems. Most of the GUI buttons will be where they are in the section of the GUI in Windows as well as with MacOS and Linux.
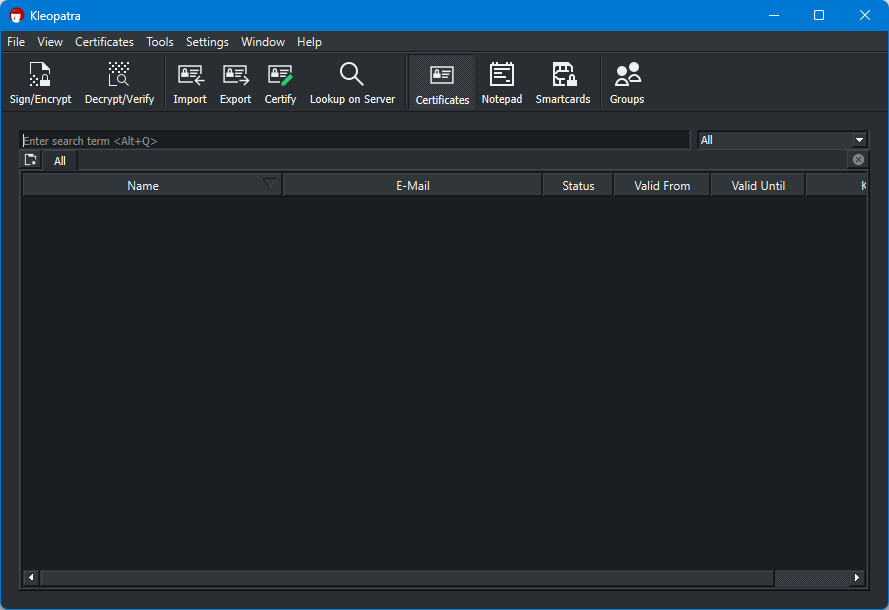
Start - Empty Certificates
In most cases, you will start with an empty Certificates setup. This will be populated already if you have setup GPG keys via command line or terminal.
Tip
Note that our Kleopatra screenshot above starts with the “Certificate” tab. If yours is not in that tab, click “Certificates” to make following this guide easier.
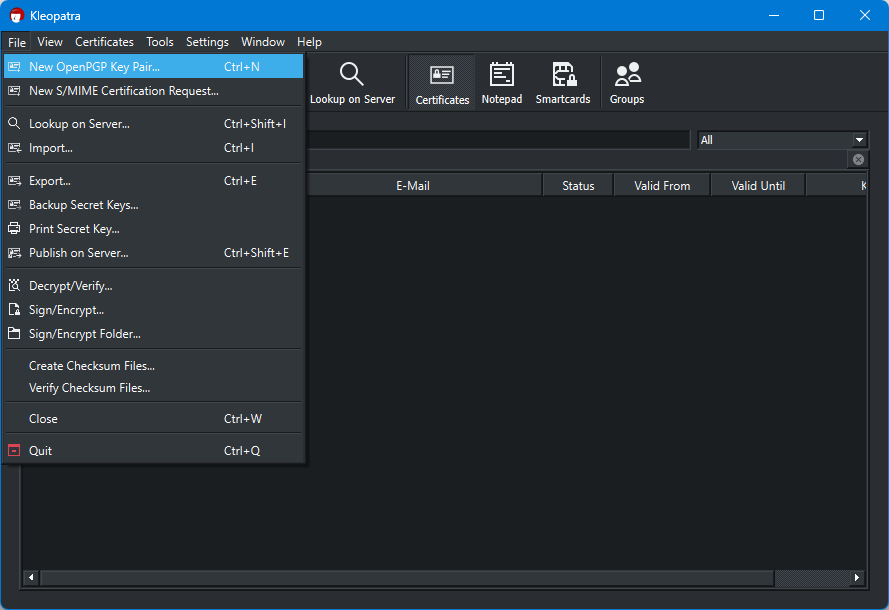
New OpenPGP Key Pair
Alt+F > New OpenPGP Key Pair (Ctrl+N) will open up dialog which will guide you in the setup.
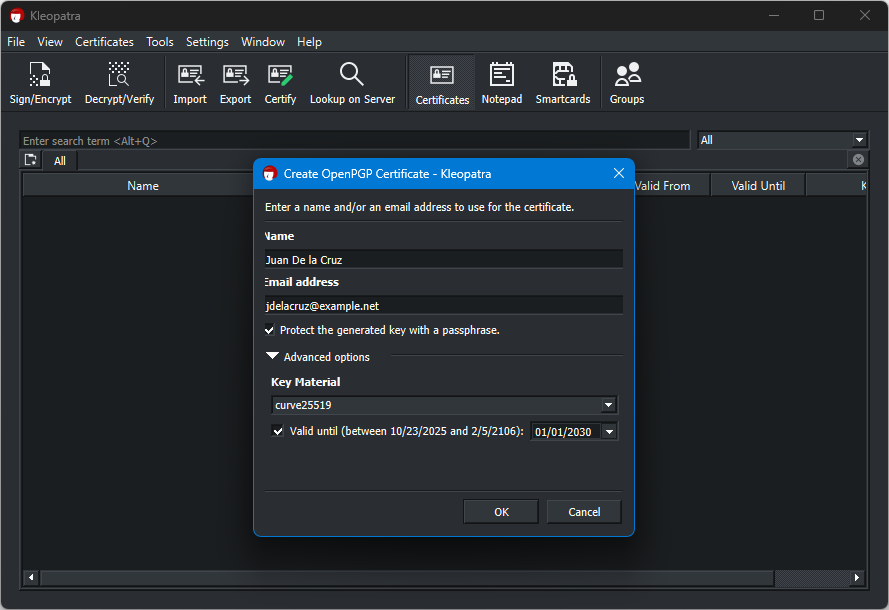
Key Pair Information
In our brief introduction to Cryptography, Assymetric Keys requires and/or generates a Private and Public Key.
The Public Key are the key you need to distribute to trusted individuals or to a central trusted key server.
While the Private Key should never be in the hands of anyone other than you. As such the information you put in the dialog below are information about you and a symmetric key to add an extra layer of security to your private key.
Ensure that “Protect Generated Key with a Passphrase” is checked.
Two-Factor
The Private Key is something that you have, while the Passphrase is something that you know. This makes the setup two-factor protected.
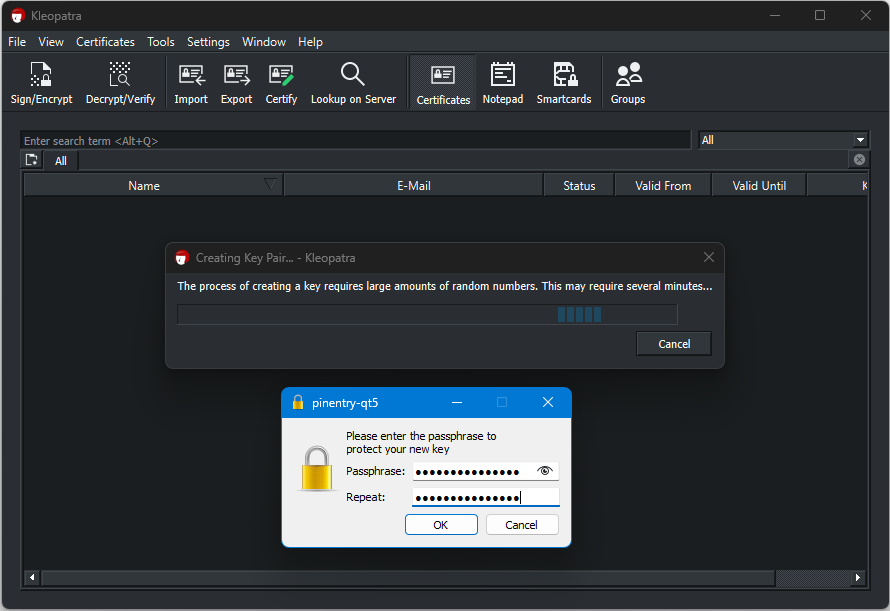
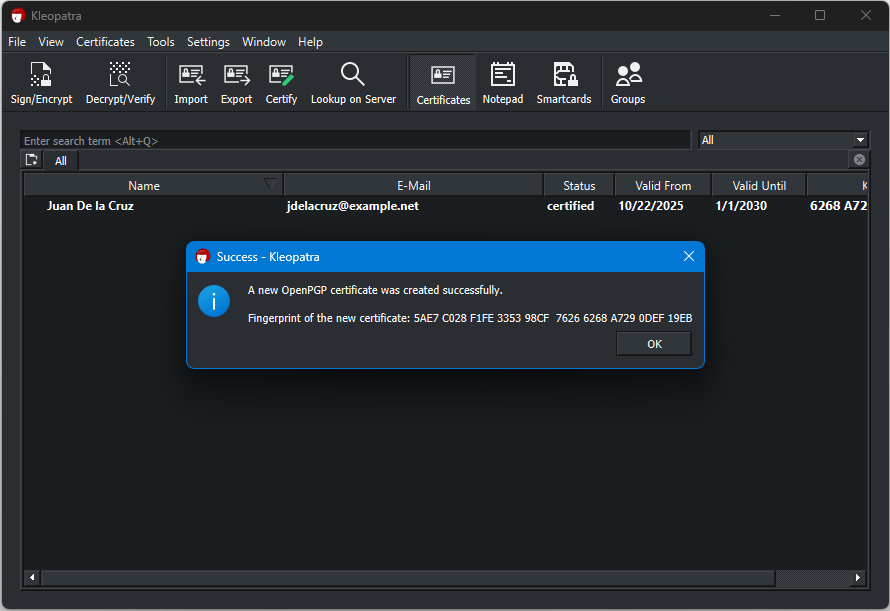
Success!
You will see a similar dialog below once the generation succeeds.
Warning
It is impossible to recover the Private Key or use it if you forget the passphrase. Don’t write the passphrase anywhere, but make sure you remember it.
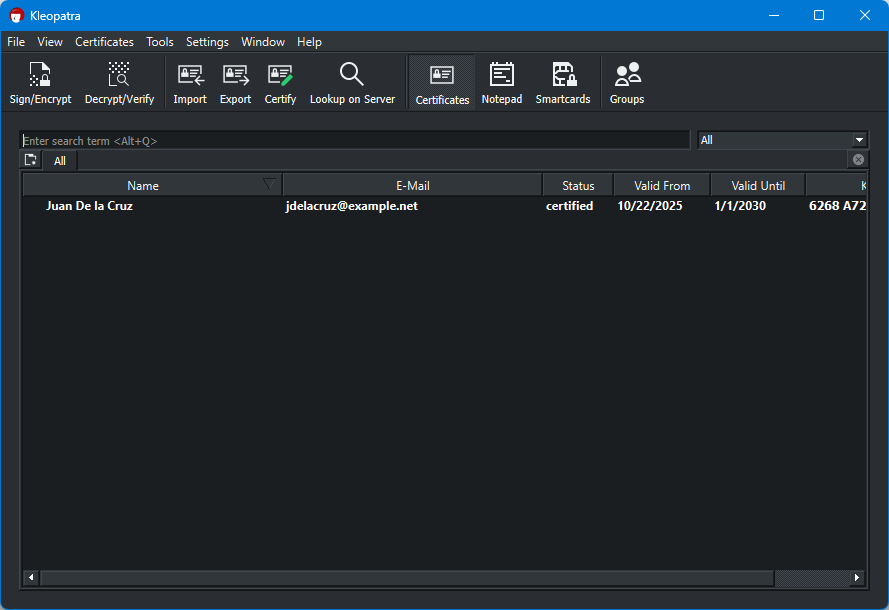
Populated Kleopatra
Info
You now have a Private Key with which you can sign and encrypt files or documents.
Signing Files
Signing a file with OpenPGP or GnuPG is a cryptographic process that uses a private key to generate a digital signature for a specific file.
The primary purposes of signing a file are authentication and integrity:
Authentication (Who Signed It)
The signature verifies the identity of the signer. Anyone with the signer’s corresponding public key can verify that the signature was created by the holder of the matching private key. It proves the file genuinely came from the person or entity claiming to be the sender.
Integrity (Has It Been Changed)
The signature assures that the file hasn’t been tampered with since it was signed. The signature is essentially a cryptographic hash of the file that’s encrypted with the private key. If even a single bit in the file is changed after signing, the verification process using the public key will fail, indicating the file’s content is no longer the same as when it was signed.
Technical Process Overview
- Hashing: A cryptographic hash function (like SHA-256) is applied to the file’s content, generating a fixed-size, unique message digest (or hash).
- Encryption (The Signature): The sender uses their private key to encrypt this message digest. This encrypted digest is the digital signature.
- Distribution: The original file and the newly created digital signature are typically sent together.
- Verification: The recipient uses the signer’s public key to decrypt the signature, retrieving the original message digest. They then independently hash the received file’s content and compare their new hash with the decrypted hash. If the two hashes match, the signature is valid, confirming the identity and integrity of the file.
Analogy
Signing a file is similar to sealing a physical document with a personalized, tamper-evident wax seal and a unique signet ring:
- Signet Ring (Private Key): Only the owner has this. It creates the unique mark.
- Wax Seal (Digital Signature): The mark itself.
- Inspecting the Mark (Public Key Verification): Others can examine the seal to confirm it was made by that specific ring and that the wax is unbroken, ensuring the document inside is genuine and hasn’t been opened.
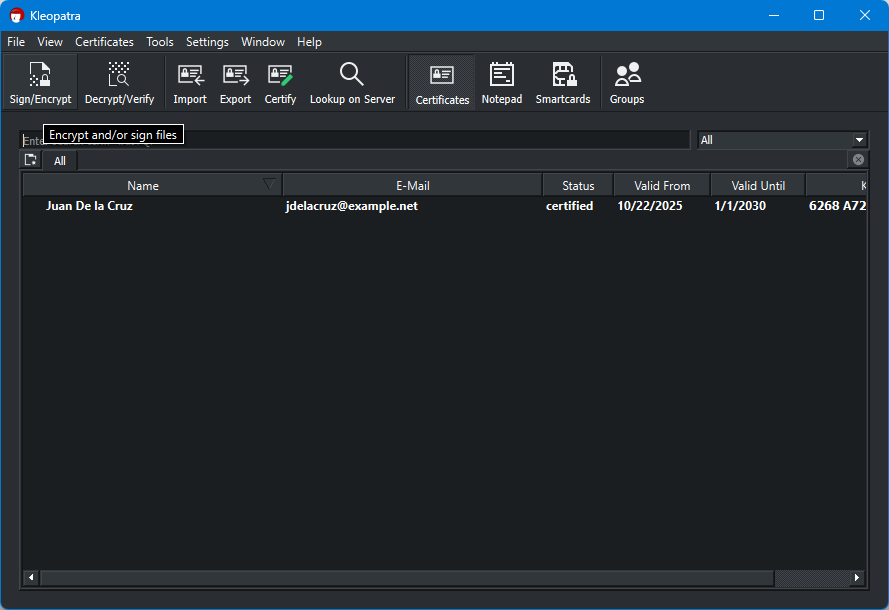
Practical Signing
Click “Sign/Encrypt” button. Look at the screenshot below to follow along.
Select and Sign Files/Documents
In the screenshot below, you can select one or more file to sign and/or encrypt.
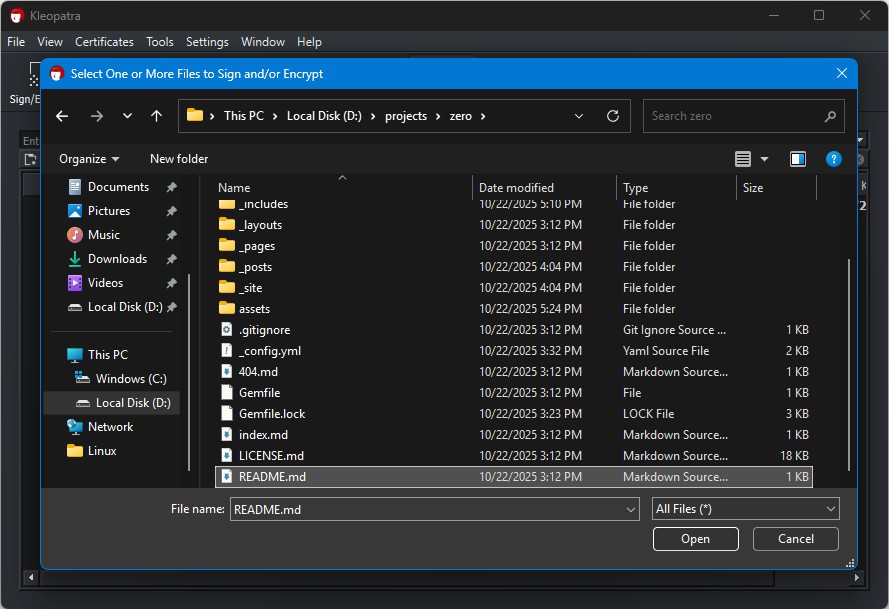
After selecting one or more files, the following dialog will be presented to you:
Sign
If you are only signing document/s, uncheck all under the “Encrypt” section. Examine Fig. 9 to understand what to do.
Zero Trust
Zero Trust (ZT) is a modern security architecture built on the foundational principle of “never trust, always verify.” This model completely discards the traditional idea of a trusted internal network and an untrusted external network, recognizing that threats can originate from anywhere—including compromised internal users, contractors, or devices. Instead of focusing resources on a perimeter (the “castle-and-moat” defense), Zero Trust assumes that a breach is inevitable and, therefore, focuses on securing every single access request to every resource. Access is granted not based on where a user is connecting from, but on who they are, what device they are using, and the context of the connection.
The practical implementation of Zero Trust relies on three core concepts: Explicit Verification, Least Privilege Access, and Assuming Breach. Explicit verification requires continuously authenticating and authorizing all users and devices based on all available data points, such as identity, location, device health, and risk score. Least privilege access limits a user’s permissions to only the minimum resources required to complete a specific task, and these permissions are revoked when the task is done. Finally, the “assume breach” mindset drives the need for micro-segmentation, which breaks the network into tiny, isolated zones to prevent an attacker from moving laterally and compromising the entire system once they gain a foothold.
By enforcing these principles, Zero Trust significantly improves security over legacy models, especially in today’s environment of remote work and cloud computing. It allows organizations to establish dynamic, context-aware security policies that follow the user and the data, regardless of location. The result is a reduced attack surface, the prevention of an attacker’s lateral movement within the network, and the capability to detect and isolate threats in real-time. Zero Trust is not a single product, but a strategic framework that requires integrated technologies like Multi-Factor Authentication (MFA), Identity and Access Management (IAM), and continuous monitoring and analytics.
Why WoT and Zero Trust Don’t Complement
The models are incompatible at the core philosophical level:
1. Different Definitions of “Trust”
In WoT, “trust” is a social construct where a person vouches for the correct binding between a name and a key, often after a single, one-time, real-world verification (like a key-signing party). This creates an enduring, human-mediated link.
In Zero Trust, there is no implicit trust whatsoever. Verification is continuous, contextual, and automated. The system doesn’t care if your friend signed your key 10 years ago; it only cares about your current access factors, such as:
- Is your device patched?
- Are you connecting from a trusted geography?
- Is your role authorized for this specific application?
2. Centralized Authority vs. Decentralized Vouching
WoT is anti-CA (Certificate Authority): The goal of GPG’s WoT is to avoid relying on a single, central authority (like traditional PKI CAs) by instead using a peer network of signatures.
Zero Trust is Pro-Policy Engine (PE): Zero Trust relies heavily on a centralized Policy Engine that acts as the ultimate authority, consuming all verification data (including PKI certificates from a trusted CA, MFA logs, and device health) to make the real-time access decision. This reliance on a central PE is fundamentally opposed to the decentralized ethos of the WoT.
3. WoT is Static; ZT is Dynamic
The trust you establish in the WoT by signing someone’s key is static and long-lived. The trust you get from a Zero Trust Policy Engine is dynamic and ephemeral—it must be continuously re-verified for every connection. You could be “trusted” by the WoT, but the ZT system would still deny you access if your laptop’s security posture failed an automated check.
In short, WoT is a model for identity assurance in a decentralized world, while Zero Trust is an access control model for securing modern corporate and cloud resources. They solve different problems.
Why the Web-of-Trust (WoT) is Unsuitable for Military Networks
The fundamental characteristics of the WoT make it a severe security risk in a military context:
Social Trust is a Flaw
WoT relies on an individual’s judgment of another person’s identity and key hygiene. In a military context, this is a massive vulnerability, as an adversary’s goal is often to manipulate human judgment (social engineering).
Identity vs. Access
WoT only answers the question: “Is this public key truly bound to this person?” It does not answer the critical OpSec questions: “Is this user’s device secure?” or “Is this user authorized to see this classified document right now?”
Scalability and Revocation
The decentralized, manual nature of key signing in WoT makes it impossible to manage at the scale of a large military organization (hundreds of thousands of personnel). Furthermore, key revocation and distribution are slow and messy, which is unacceptable when a key compromise requires instant action.
WoT Limited Use
Limited Use
While Zero-Trust is the mandated option for best operational security. WoT still has some limited use-case, this is not legal advice but an option for specific limited use-case.
The WoT concept might see limited use in highly specific, compartmentalized scenarios, but never for core operational network security.
1. Offline, Air-Gapped Key Verification
In environments where direct network access to a centralized Identity and Access Management (IAM) system (a core ZT component) is unavailable, a WoT approach offers a way to establish trust:
Scenario: High-security, air-gapped systems or special operations forces operating in environments with no secure network connectivity.
Use Case: Verifying the authenticity of software, patches, or data at rest. A technician could use PGP/WoT to verify a new software update was cryptographically signed by two or more previously verified team leads (a limited, high-trust ring) before installing it on a mission-critical system. This relies on the WoT’s strength: proven identity binding to a key.
Limitation: This is a static, manual, one-time verification for integrity, not a dynamic access control model.
2. Secure Communications in Uncontrolled Environments
For external communications where a military’s own secure email system (using a centralized PKI/Certificate Authority) is unavailable or compromised, PGP (which uses WoT for key distribution) remains a strong tool for encryption and non-repudiation.
Scenario: A unit needs to securely communicate with a journalist, an academic, or a friendly non-governmental organization (NGO) using publicly available, end-to-end encrypted email.
Use Case: The PGP/WoT mechanism is used solely for secure key exchange and message encryption/signing between the parties. The military personnel would carefully establish a strong, verified “ring of trust” with those specific external parties to ensure they are encrypting to the correct key.
Limitation: This only secures the data in transit and the sender’s identity for that message. It is entirely outside the Zero Trust control plane of the military’s internal network.
Web of Trust
In the previous section, we talked about “Signing”, this time we will tackle establishing Web of Trust. This is a necessary concept before we proceed with encrypting files.
Establish Your Own Web-of-Trust
In GPG’s Web-of-Trust (WoT) model, trust is decentralized and peer-to-peer, rather than hierarchical. It is critical to not place inherent trust in a central source of data (such as a key server) when importing a public key. Instead, you must explicitly establish trust by verifying the key owner’s identity and then cryptographically signing their key.
However, this differs fundamentally from the modern Zero Trust security model, which operates on the principle of “never trust, always verify” for all access requests to a network or resource, eliminating implicit trust entirely, regardless of identity or location.
Info
For us to be able to encrypt document for someone or for several people, we need to have a copy of their Public Keys first. We need to import their Public Keys and certify it locally on the machine we will use to encrypt the data.

Other People’s Public Key
Where do Public Keys come from?
They come from people we trust. We have to help or teach one-another how to generate their Key-Pair and how to use it correctly.
After generating a Public Key, we can either submit it to a Key Server or pass it in a way we can have initial confirmation that we are getting the Public Key of the correct person.

Certifying someone’s Public Key in your setup allows you to Sign/Encrypt documents specifically to the Public Keys that you trust.
Only the people who has the Private Key or the Public Keys you certify can decrypt the encrypted files.


Note: The Advanced section is expanded and the checkbox for “Certify for everyone to see (exportable)” is unchecked because in this Trust Model, we discourage people from trusting someone just because we trust the key. Complexity and individual verification ensures better confidentiality and integrity. At this point Availability can be a liability in certain Operational Security contexts.
Certify - Trust a Public Key
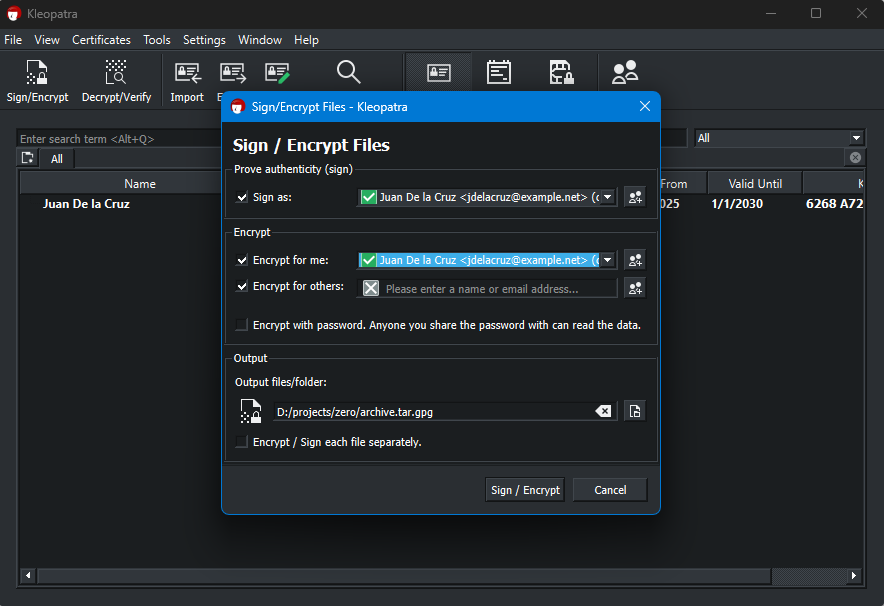
If you are encrypting document/s, ensure that “Encrypt for me” is checked. And that you have already imported the Public Key of the person you are encrypting a document for.
If you have generated your Key Pair following the steps or example above, it should have a passphrase and Two-Factor will be taking effect. We can not certify a Public Key if we do not own or know the passphrase of the Private Key on our machine. The screenshot of the dialog below will be how it will look like when it prompts for a password.


Public Keyring
The screenshot below will be how approximately it will look like after you import someone else’s Public Key into your Public Keyring.


Note the “Output files/folder” directory in Fig. 20 so you know where the encrypted file will be and click “Sign / Encrypt” button.
The encrypted data will be at the designated directory and will be ready for you to distribute or disseminate.